Designers see a moodboard as a compass for a project's visual journey, but clients often see it as a literal preview of the final product. We’ve all felt that quiet tension in a meeting when a client points to one image and says, "So, the website will look exactly like that?" This common disconnect is where great projects can stumble before they even start. The key to a successful project isn't just about creating beautiful visuals, it's about building a shared understanding from day one.
Learning how to explain design concepts effectively begins long before you present a single image. It starts with turning your client’s business goals into a visual language you both speak fluently. This is your chance to transform their brief from abstract words into tangible ideas.
Setting the Stage for Success
Before you even think about collecting images, the most important work happens in conversation. A moodboard is not a sneak peek of the final design. It is a collaborative tool for establishing a project's 'vibe' and direction. Your first task is to create a shared dictionary with your client. When they say they want a 'modern' or 'clean' look, what do they actually picture? Does 'modern' mean minimalist and stark, or does it mean vibrant and tech-forward?
Translate their business objectives into visual territories. If they want to 'appear more trustworthy,' you can introduce concepts like stable colour palettes, classic typography, and uncluttered layouts. This initial alignment ensures your moodboard is built on a solid foundation of mutual understanding, not assumptions. Think of it as drawing the map together before you start the journey. This groundwork prevents miscommunication and sets the tone for a smooth, collaborative creative process.
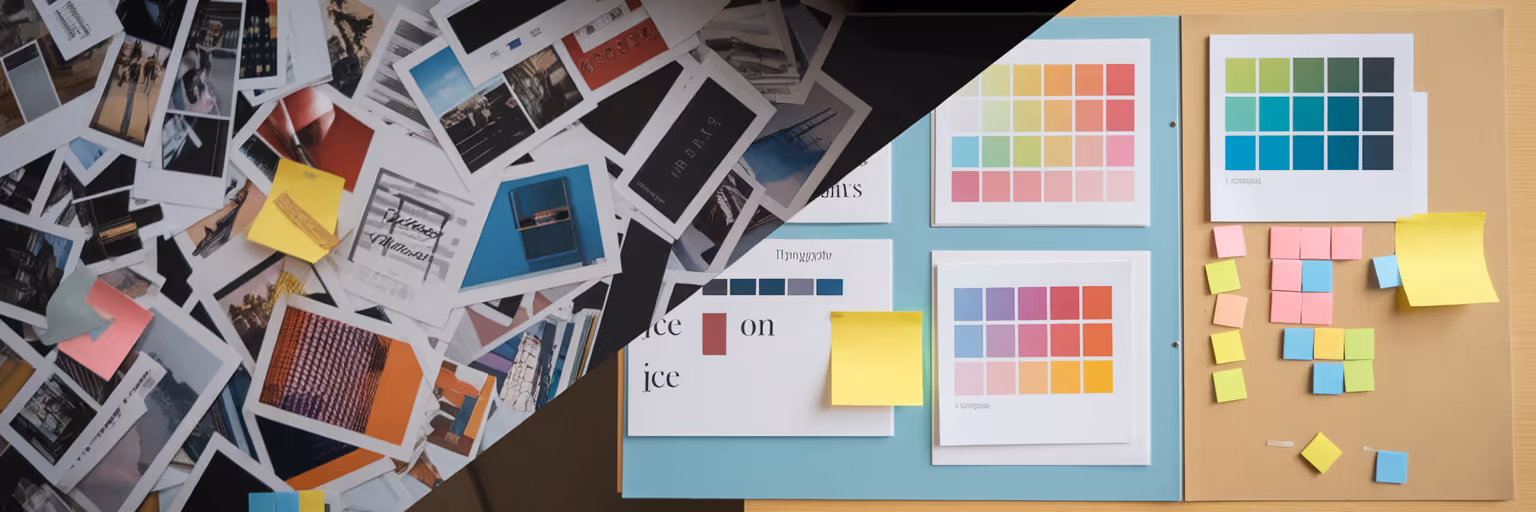
Curating a Clear and Compelling Moodboard

With a shared vision in place, you can now move from conversation to creation. The goal is to build a structured collection, not a scattered collage of things you like. An effective moodboard provides clarity and direction. Instead of overwhelming your client with dozens of images, organize your board into logical sections that tell a coherent story. This is one of the most crucial moodboard presentation tips for maintaining focus.
Structure your board with clear categories:
- Color Palette: A focused selection of hues that establish the core emotional tone.
- Typography: Examples of fonts that convey the brand's personality and ensure readability.
- Photography Style: Images that define the mood, subject matter, and lighting.
- UI Inspiration: Specific examples of layouts, buttons, and interactive elements that feel right.
The real magic happens when you annotate your visuals. A short note explaining why an element was chosen connects the image back to the strategy. For example, next to a photo, you might add, "This image reflects the warm, approachable lighting we discussed for building customer trust." This is where a tool like Bookmarkify shines. Its moodboard view lets you save inspiration directly from the web and organize it into a clean, shareable board with notes. If you need fresh ideas, you can explore curated galleries like our daily inspiration feed. Remember, less is more. A curated board with 10 to 15 impactful, well-explained images is far more powerful than 50 random ones.
Telling a Story with Your Visuals
Now it's time to present. The best way to present moodboard to clients is to frame it as a narrative, not just a collection of pictures. Start the meeting by briefly revisiting the project goals you established together. This simple step grounds the entire presentation in the client's own words and reminds them that every choice is intentional and strategic.
Guide them through the moodboard like you are telling a story. Move logically from one section to the next. You might say, "We'll start with the colour palette, which sets the emotional foundation for the brand. From there, we'll see how that feeling is carried through in the photography and typography." This structured approach makes the visual communication for clients clear and easy to follow.
Use 'bridge language' to connect design choices to business outcomes. Instead of saying, "I chose a sans-serif font," try, "We've selected this clean font because its excellent readability supports the brand value of simplicity and makes your message clear." As an article from the UX Design Institute highlights, moodboards are essential for translating abstract ideas into tangible visuals. Your narrative is the bridge that makes that translation happen. Conclude by summarizing how all the elements work together to achieve the desired look and feel, reinforcing the cohesive vision.
Guiding the Conversation for Constructive Feedback

The presentation is done. Now comes the most critical part: getting useful feedback. This is where a solid client design presentation guide becomes invaluable. The most common mistake is asking a vague question like, "So, what do you think?" This invites equally vague, personal opinions that are difficult to act on.
Instead, ask specific, targeted questions that prompt strategic feedback. A practical tip is to number the key visuals on your board. This allows clients to give precise feedback like, "Image #5 feels a bit too corporate for us," instead of waving a hand and saying, "I don't like those pictures."
Listen actively when you receive criticism and ask follow-up questions to uncover the root cause. If a client says a colour feels "too loud," ask what emotion it evokes that feels wrong for their brand. Your goal is to turn a subjective reaction into an actionable insight. This reframing transforms the feedback process from a critique of your taste into a collaborative refinement of the strategy.
| Instead of Asking This... |
Try Asking This... |
Why It Works |
| So, what do you think? |
Which of these three directions feels closest to the 'innovative' brand personality we defined? |
Focuses the client on project goals, not personal taste. |
| Do you like this color? |
How does this color palette make you feel? Does it evoke trust and stability? |
Connects an emotional response to a strategic objective. |
| Is this photo okay? |
Does the energy in image #7 align with the active, vibrant community we want to attract? |
Prompts specific feedback tied to the target audience. |
| Any thoughts on the fonts? |
Does this typography feel clear and easy to read, reflecting our brand value of simplicity? |
Links a design element directly to a brand value. |
For more ideas on improving your creative process, you can find other guides and tips on our blog.
Translating Feedback into Actionable Next Steps
A successful meeting ends with a clear path forward. Once the feedback session is complete, your final task is to close the loop and turn the conversation into a concrete action plan. This demonstrates professionalism and keeps the project momentum going.
First, summarize the key feedback points and verbally confirm the agreed-upon changes. This ensures everyone leaves the room with the exact same understanding. Second, clearly outline what happens next. Whether it's a revised moodboard or the first set of wireframes, managing expectations reduces client anxiety. They know what to expect and when to expect it.
Finally, create a single source of truth. After the meeting, update your collection based on the feedback. A tool like Bookmarkify is perfect for this, as it allows you to adjust your moodboard and share it via a unique URL. This gives the client a permanent, updated reference point they can always access, ensuring alignment as you move into the next phase of design.
Ready to transform how you present moodboard to clients? Try building your next one with a tool designed for visual clarity and see how a structured approach can make all the difference.